Showing posts with label Complete. Show all posts

Saturday, July 30, 2022

You are not alone.

I generally think of myself as heavily introverted, and that woodworking, the hobby I've been obsessed with for ~25yrs, is a solitary hobby. Most often what I THINK appeals to me is quietly cutting joinery late into the night in solitude. 

This is all a lie.

Sure, there are aspects of that romanticized loner life, but honestly evaluating most treasured projects & accomplishments, very few of them have really been that hermit at work, in fact quite the opposite even if you just look at this blog. (Your mileage may vary)

Likewise, many of the most memorable social interactions in my life have been paired with making things. Remodeling, volunteering, roofs and asphalt maintenance etc make it seem like working & making things might be my true love language. (fact checkers: actually its quality time) but clearly there is a connection. I suspect that both of my readers already know that these woodworking things go where feelings go in other people. 

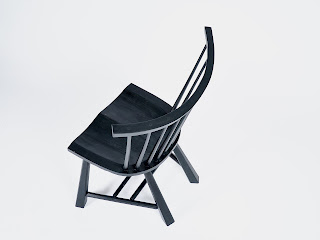
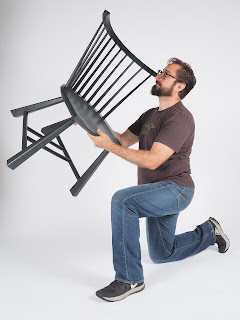
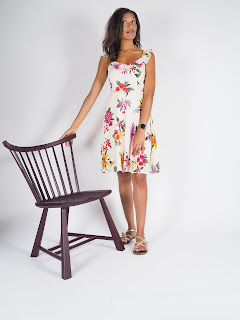
If woodworking alone is good, woodworking with a partner is gooderer (sp) to that end I wish to share with you a rather monumental project completed, finding a partner*

I should discuss much more about this project, what sharing a hobby with your spouse is like and perhaps some of the fun & challenges that presents. However, considering these chairs were in-process for ~a year,  have been finished for months and even had glamor shots for a while, perhaps I should just let the finished pieces (design by Bibbings & Hensley) speak for themselves.

*Now I know not many will get as lucky a I have here (she's the complete package, she even enjoys finishing my projects!) but find yourself someone to make stuff with, or at least makes some stuff and find someone that you can talk about making with, you'll be glad you did.


Thursday, May 19, 2022

½ Time

If you know me much at all, you know that I'm more a thinker than feeler. Of course, I have emotions (deep down), but they are invariably driven by using the past, to draw conclusions and find patterns moving toward a desired future state. So I present a few vignettes of current life, somewhat connected and even loosely woodworking, though there will be no cut lists or joinery diagrams.

The Dartboard

Owen, living with his mom these days, texted me asking to borrow a drill to help a friend hang a dartboard in a plaster wall. I gladly dropped a few helpful items off next time I was in town. When he returned the tools, he wanted to show me something. He had bought a small tool box and some simple tools to be better prepared to handle such a situation in the future. Of course, proud to see him taking an interest in such things, I quickly filled his tote with duplicates and other tools lying around the shop that might fill some holes in his budding tool collection (like his own drill.) Now, with the experience of being "handy" he was taking more interest in what many of the tools that have always been at hand, really did. 

It reminded me of my own tool mentors along the way. Dad, gifting me a small set of sockets & wrenches when I had my first car, and some others later when I moved out of "drop by and borrow some tools" range. I remember being touched when two draftsmen in my cubicle bought me my first cordless drill as a wedding gift, to equip me for what would come my way, so that oil changes and picture hangings wouldn't be prevented by lack of tools. 

Men often get accused of being poor gift givers, but based on my experience, I've found most to be quite generous in helping to get a young person get the tools they need, when they're ready for them. (ask me sometime about the tool shower we threw for a cousin prior to his marriage.)

The Kitchen

When I bought my first house, like most, it needed work. Part of that was lightly remodeling the Kitchen. One thing I found was the window sill was rotted out. I headed off to dad's to grab a 2x4 and cut a couple of notches in it to fit in the window and be done. I remember looking at my father as some sort of wizard as he walked me through selecting a weather durable timber, matching the thickness, taper, contour and edge profile to match the one that came out. It was mesmerizing, and opened my eyes to really look at the work I was doing, not to simply get it done, but to do it properly.

I was reminded of this on a recent project for my Daughter's new apartment in an old house that has a tiny kitchen with literally 2ft² of counter space. She needed some additional work surfaces, and called in Dad for some assistance. There were the typical constraints with apartments (no attaching to walls) and old houses (sloping floors, radiators, maneuvering up cramped stairs.) I can't speak for her, but perhaps installing something that fit the need above the bare bones solution, has a similar effect in gaining pride in getting your place "Just Wright"

The Patriarchs

From youth, I skip ahead to a ripe old age to two exceptionally mighty men passing in the same week at the age of 92 this February. These men never met each other and often I may feel I barely knew either, yet each gave a ¼ of my genes. These two men lived rich, full lives touching all those around them. They will be missed, but their passing is not merely sadness, their memories serve as high praise for the lives that they lived.

Freeman was a man I only had the privilege of meeting once early in 2020. Through the wonders of technology, and the perseverance of my mother, she was able to connect with her father, changing the closing punctuation in her life away from just a question mark. What I do know of Freeman is that he was a kind hearted man, and that shows in the kindness of his offspring. Not just my mother (whom I know) but in the warmth that we have been drawn into his family by his son and my "new" cousins. While new to me, they have immediately felt familiar with many common interests; trees, convertibles, spoon carving, dump trucks, simplicity, home building, making music (even if it skipped me), engineering, stick chairs. Perhaps these are common to many families, but still I saw the legacy that Freeman has left, and it's one I can support and hope to be a part of.


Maron (my dad's dad) contrastingly was a fixture in my life, always around, yet I must admit not much more known by me. My family is large and when I would go to visit, there's always many cousins of my own age to play with, so I take the blame for not getting to know him as well as I should. Also, from the shear effort required to raise all those kids, must've wore out Grandpa. I swear most of my memories are of him asleep in his chair, one shoe off, watching or listening to a Cubs game. That isn't meant that he wasn't involved I can certainly also remember him taking pictures and teaching us to jump rope, play jacks and hopscotch, but almost always a troop of us rugrats.

In our family we often do things the uncommon way, intentionally or otherwise. Having little kids in your 40's (Guilty, and I have an aunt my age) Dads and uncles starting to working with their kids as second careers, things like that. So it fits right in that Gpa Maron would become a prolific woodworker well after his sons and even grandsons had taken up the hobby. In the last 14-15yrs After he retired he finally had a minute to himself and he artistically designed and made vintage cars from scraps, over 400 unique ones, keeping track of where each one went in little notebook.


The Introspective Conclusion


Despite my current age, I still often feel unprepared, youthful and like I'm still the "new guy" in many situations. Still, I find in more and more situations, I'm the one with the skills and experience needed to step in and solve the problems. I suppose this means that I've moved around to a new position in the circle of life. If the long lives of my patriarchs serve one lesson to me, it's that at 46 I've now reached the ½ way point (At least I can hope)

Time to rally and make the most of the second half.

Saturday, July 4, 2020

Additional Horsepower

When starting out in woodworking, most think they will never be able to afford all the tools they need/want/desire. But with patience, and the accumulation of years, the gaps fill to a point where, at least I don't feel limited by the tool set I have. In some cases, that means that while I might have multiples of some things (shiny planes & shaves) I might be missing some basic functionality that many others assume as first rung tool ladder purchases (power miter saw, plunge base router). I often find it surprising to compare tools with other woodworkers, and find we often have odd gaps where our tool paths diverged either from specialty, ethics (power/hand), space, or finances.

This is a long way to say I don't have sawhorses. I've never owned them. Whenever I needed them I had always somehow made do with some other temporary support and thought "I should get some saw horses" and then do nothing until the next time they would be handy... Of course there are numerous great designs (intrigued with the knock down burro design,) and they can even be purchased, but that all seemed like something I'd get to someday, but never did.

What I did have was a crazy PVC pipe monstrosity. This bulky, ugly cage was something I knocked together a couple of years ago when I was enamored by the material and I was getting into Gymnastic Strength Training. I made this contraption to do parallel bar dips. I never really liked it, but figured, "no problem, I'll be up to using rings for everything in no time!" Narrator: He did not quickly progress to rings. (Rings are hard). While I do hope to get fully on to those ring progressions, I finally decided the cage had to go and I needed something better. I landed on Krenovian parallel bars.

To be honest, I had not really liked the design before. They always seemed a bit too precious and complicated and light duty for the somewhat rough, disposable nature of sawhorses (though certainly not the most complicated I've seen) Still, I landed on them because of the lack of protuberances in the undercarriage interfering with their (or rather my) action.  I also admit they look nicely stored away, and would certainly match my emerging shop vibe once burned "finished".

While I'm pretty sure I could have come made them from memory, or customizing based on an image search, I recalled an old Fine Woodworking article on the topic. I found the one I was after (with of course some time rummaging through adjacent articles as one does when going through FWW) and found the one I remembered.

It was by Anissa Kapsales I didn't recall this fact, in fact at the time I read this originally, I didn't "know" her at all. If you don't, she is a delight and adds a lot of fun to Shop Talk Live podcast which is a must listen if you are this far into this post and not bored to tears. I got no little kick out of this,  it was like finding out the interesting person you met as an adult, actually was in your high school and you just hadn't known them then.

I did make a few alterations to the design; it seems the designer had prioritized their function as sawhorses over gymnastic parallel bars, weird. This would not do for me, but I did compromise and make them a little shorter than initially planned so they can (with a simple plywood top panel) also stand in as out feed support for my table saw. (Yeah, the irony of another simple thing that I've somehow avoided) I also raised the lower stretcher a bit to better balance the split and to align with my saw bench height. I used some different thicknesses based on scraps I already had on hand, and I rounded the top edges and added an angle cut to tweak the feel/look to taste.

draw bore pegsNow that I've completed the pair, I have a newfound appreciation for their design. They are pretty smart, a functional tutorial along the lines of a traditional bench sawhook that is slightly more complicated than it needs to be, but has benefits beyond its intended function. Heres why; in building a pair, a new woodworker would make 4 blind mortise and tenon joints (I draw bored mine), 4 through wedged M&T joints and 4 (pinned) lap type joints. This is all in the context of very economical material usage that really can be made from short odd scraps in a variety of thicknesses that I almost guarantee you already have on hand. This is an ideal project for someone new to joinery looking for practice in a project with some leeway on the end result.

Beyond the simple project that packs a lot of learning in, Krenov's design reminded me about one of the goals I'd hoped to achieve with this blog.

It's hard to believe that in the seven-ish years I've been occasionally blogging, I've never really discussed what I may be most qualified to talk on. In my secular job, my expertise, such as it is, is in the field of engineering, applying and analyzing geometric dimensioning & tolerancing (GD&T). In this realm, there are numerous problems that engineers often try to solve by over constraining a design (think, wobbly 4 legged table vs stable tripod) sometimes it's obvious, but unavoidable, sometimes it's less obvious but by taking a constraint theory approach to looking at the system, the root cause of the problem (and often then the solution) emerges.

I've often thought that woodworkers have had to deal with and apply constraint theory problems over the ages (with the corollary that due to the constant wood movement changing the dimensions of parts, it is a lesson that must be learned) Many vernacular designs I have observed have (un)knowingly have addressed these constraint problems. For instance, a four legged table with a normal apron structure, the top normally has enough flex and will "hinge" across the high corners resting easily on all four legs, but an excessively stiff undercarriage will not give in this manner, introducing the dreaded wobble.

These sawhorses similarly are a light frame that is easily warped/twisted which could seem flimsy in that direction but actually will allow the four legs to rest on an irregular surface. With a load applied these easily accommodated one leg on a ¾" horse stall mat. The wedged/pinned joints will hold tight through any induced flexing of the structure, which the hardwood (oak in my case) can likewise absorb. The cutouts in the sled feet make this flexing all the more possible allowing solid ground contact, with any downward force applied. And the direction that force is applied it is incredibly strong for its weight, since the upright is directly inline with the applied force. The narrow body and unobtrusive feet are other definite advantages to the design.

Overall these Sawhorses parallel bars will be a nice addition to my space. and I wish I hadn't waited so long to make some, it was a good fun quick project that uses very little material and doesn't take up much space when completed. I hope this inspires you to make a pair, as I think they would be at home in a shop/gym, (unless you are already progressed to using just rings, in which case I hate you and hope you rot :)

Monday, December 16, 2019

It’s All Fun & Games (part 3)


You've tuned into the exciting conclusion!
(Recap: part 1 and part 2)
[skip intro]

This cabinet does not fit with my normal methods. Sheet goods, not much joinery, mostly painted and quick construction. (Insert self deprecating joke here.) Still, there were some things I was worried about, and worked out prior to construction, so I started with a (gasp) drawing. I share this information here not because this is the direction I intend to take this blog (so regular readers might skip this long post), but just in case anyone in the arcade cabinet community later finds something they'd like to borrow, I'd like to provide that resource and encouragement for them to do so.

Control Boxes


We started with the center control box because that was the part the boy needed completed for his assignment (Phase 1). The most fun part; don't do this part first or else everything will have to be made to fit around this, making the cabinet much more challenging to dial in perfectly, rather than just fitting the control box ±1/16" to fit the cabinet.... Or perhaps you should do this part first and stop there, because you have everything you really need to start having fun and the rest is a lot of work for what amounts to a fancy stand for this box.


The concept for these boxes revolves around modified traditional Japanese carpenter boxes, which are pretty genius in their design & construction. Simple, bomb proof, clever and require no hardware, yet provides access to controls if you need to get at them later. By angling the top, I made it a bit more complicated, as did the angled end surface for P3/P4. There was some order of operations and head scratching to make sure I got surfaces flush and the angles all correct (thanks high school geometry!, also block plane) This was especially the case with the tapered dovetail connection to lock the boxes together, but that's mostly a game of what shape goes where (see pictures) rather than any ubercomplicated joinery.


I glue the long grain joints where I can for strength, and since we charred the surface as the finish, we carefully finished all visible surfaces prior to glue/assembly. Simple finish pin nails (screws on the lid batons) and it comes together easily and sturdily.

(Tip: the hole for the locking pin gets drilled at the very very end)

Carcass Construction


Most arcade cabinets are made with MDF, which is a fine enough material for it's purpose, and especially given the vinyl/paint finish applied is a good fit. Despite MDF's lower cost; it's also heavier, and has a tendency to not wear as well long term when moving, plus I prefer working with plywood, so that's what I went with instead. I did as best as I could with sizing components (e.g. sides are <1/2 sheet width); I still ended up needing 3 sheets to get all the major components. (Exact quantities are not 100% clear since I have lots of pre-existing scraps in my bins that we utilized where we could.) We used 3/4" "Classic Birch", which is marginally better than paint grade BCX plywood (additional ply's and a slightly smoother surface), but it's not great plywood. (Tho' this aint fine furniture either.) In retrospect, I think I would have preferred to use 1/2" at least for the middle panels to cut some weight.
Most MDF cabinets also call for T-molding to cushion/round the edges and give a more finished edge. I chose not to, to save some expense (mostly from needing a specialized router bit to go around curved edges) this meant a simple round over, filling and sanding. T-molding would probably be nicer, but I'm not unhappy with the results and an acceptable way to cut costs if using plywood.

I'm sure there are several ways to put this together, we used glue & pocket screws spaced fairly close together. Then fill all the pocket holes with shop made plugs The most challenging bits are aligning the parts during assembly. Draw a line to show the reveal, then use clamps provide a stop so the piece doesn't shift while driving the screws. It's plenty solid especially once the "drawer" is added. 

The Big Drawer


Possibly this is the part you should start with, then the carcass, then the control panel to reduce the impact any errors might have. I did it last... It's a pretty straightforward (and hidden) pocket screwed frame with plywood shelves mounted on drawer slides. I originally intended to have stops & latches attached; but in practice it moves with just enough friction, but not too freely... lethargy wins again.

Getting Curved


If there was one thing I'm not sure of, it was using regular plywood and kerfing/bending  it to follow the line. It worked, but did create facets and personal stress during the process. The boy likes the facets, so I guess I like that about it, though a smooth curve from bending plywood or veneer over ribs seems like a better choice to me (I couldn't get bendy ply in a timely manner, so that drove the decision)

What I did learn about this process is:
  • This kerfing calculator is pretty accurate, though I felt like we needed an additional cut or two from it's suggested value. Do a few test runs on scrap.
  • The kerf show face will be dangerously thin to prevent splintering when bending. This is a problem when manhandling a nearly full sheet of plywood.
  • We utilized a T-square Circ saw jig since my rip fence wasn't wide enough to do all the cuts on the Table saw.
  • We used Polyurethane glue in the kerfs to provide a paintable gap fill with the expanding foam. This kind of worked (required some cleanup chisel work) but would have been better to just use paintable caulk afterwards

Electronics

There are many resources for electronics setup with the retropie setup, so I won't go into great detail. I will just highlight a couple of things I didn't know about.

I stressed about snap-in vs. screw buttons. A clean hole from a correctly sized carbide forstner bit (highly recomended) and the widely available snap-in will be just fine in 3/4 wood. Normal use pushes them tight into the hole so they won't pop out, and since this isn't a public arcade, I'm not worried about vandals prying them up from the top surface. It's literally fine.

I was worried that given the increased depth of the wood top panel, the joystick would need extensions. I tried them, it's better without. They aren't required at 3/4" thickness.

Inside the main box, I found it useful to snake a few extension cords for USB/HDMI/power through the exterior. This makes final connections easy. I recessed the ports and hot glued them in. It's a nice feature and makes the central unit feel much more polished than other possible solutions.

I was originally going to wire this cabinet up with the traditional socket and switch, but found a simple power strip (with longish cord) on the top shelf is hidden and fine. The cabinet construction lets you snake the power cord out easily. Then TV, Raspberry pie etc. plugs into that.
When wiring up the USB controllers, get them wired to the controls FIRST, then mount it to the box based on wire slack available. Speaking of mounting the control PCB's ...Hot melt glue is fine, like we did on the first two... but use the low temp little guns, not the upgraded hi temp gun I bought mid project and fried P3 & P4 the first time and need replacements. 

Painting

It's painted. I dislike painting, but you probably already have an opinion on that. Trim everything, fill everything, lightly sand everything, prime (always Zinsser BIN), paint it how you want.


The Plans


A few things changed from the rough drawings outlined here, hopefully they will be obvious as you see in the construction photos or read above. but these are here for reference for those that benefit from numbers.

Most notable change is, there was originally a bezel that was to give some structure and mount the TV Panel to. In the end, I found the construction to be solid and it wasn't needed, so I simplified the TV mount to an articulated VESA arm, which allows re-positioning when converting 2p to 4p. The back and top are all one piece not two as shown in the drawing.  Also, originally I had ribs to support the curved top. These aren't needed given the way I constructed it., Had I used a thinner more flexible part, maybe it would.

This was a great project. We've had many good moments at this machine. It was great to work with my son on a project that we both can enjoy both from the time spent working together on it, as well as the time spent together at the controls. I hope there are many more beyond this one.





Friday, December 13, 2019

It’s All Fun & Games (part 2)

 When the boy expressed an interest in building an arcade cabinet (See exciting backstory in part 1), I was largely disinterested, because they seemed to be large and uninteresting boxes at first glance. And not to try to offend anyone, but often they are garish and clash with almost everything decor wise outside of the over stimulated atmosphere of a dimly lit arcade of days gone by. As a single father of two teens, I'm pretty sure Architectural Digest isn't swinging by for a photo shoot anytime soon, but still many arcade cabinets are just plain ugly, clunky and absolutely HUGE. Still, I wanted to support his interest and so I began delving into numerous designs so I could help guide his choices into something I'd be OK with being in my house, and would be fun to play together.

Form


One design decision that needed sorted was form factor. There are 3 main types: Free standing cabinet, table top, and Arcade-in-a-box.

Arcade in a box (with HDMI out to TV) seemed like an interesting idea plus would be portable if wanting to take it to friends houses, playing on the projector etc. But unfortunately I think this would miss out on some of the best things about arcade style controls, i.e.  the jostling that ensues from competitive proximity in 2P games and being able to lean into the joystick and buttons with a bit of solidity. The later also ruled out the table top style for me, (That and the fact that it would still need stored someplace largish or take up table/counter space.) This steered us to a free standing cabinet. Traditional freestanding cabinets are very deep some ~40" deep.

Style


One other major design choice is whether you are going for authentic with tube monitors bezels etc or not. That will drive excessive depth and extra electronics, and that we were going for a vibe rather than authenticity, we decided we would veer from traditional shapes. We were both rather impressed by the shape of this one, and used it liberally for inspiration. I was mostly impressed with the round top as it sort of lent a modern, minimal take to the side profile to my eyes, but there are many many options for shapes to consider to get a shape that looks right to you. In the end utilizing a modern flat panel allowed for the unit to be significantly less deep (24") and could be smaller still if desired, though at some point it gets tippy, which is why we chose a more square corner at the bottom.
(Honorable mention goes to an idea to incorporate a TARDIS MAME cabinet, something else we both wanted to make, but in the end it fell away)

Controls


Another major design step is determining control layout. In an arcade, there are many setups and controls optimized for each specific game. With a MAME cabinet, trying to incorporate all of them (knobs, balls, joysticks, buttons ...) often leads to the strange, cool and weird. One major decision point is the number of players. We eliminated single player from the choices since so many of our favorite games involve cooperative/competitive play. There are many interesting 4 player games, but allowing space for the panel starts to make for a very large unit. At some point we asked "what if it could convert from 2p to 4p mode?" and this is when inspiration struck, and where we had a chance to innovate in our design. 

There are some others out there with modular controls in their cabinet (It's very cool to explore what other creative people come up with) but as far as I know no others that transform in quite the same way as ours, with a removable arcade in a box style that has attachable "wings" for P3 & P4. This also necessitated a pull-out "drawer" to allow the cabinet to convert so the wings can attach. This project began taking on a life of it's own beyond what the boy could complete for the project, but it was also pulling in my interest for doing interesting things.

Hardware


Arcade memories are interesting. I found I had distinct memories of how things were, even though after researching you find out you are mixing memories. I love the uber-clicky Happ buttons, but also the convex button shape (false memory) I also like the ball type Sanwa joysticks over baton Happ joysticks (you might have your opinion, this is mine) in the end I got some super clicky buttons for "Start" buttons to scratch that itch, but went with the Sanwa type buttons/joystick elsewhere (they still have a nice enough "click") it pays to do some reading about the mechanical differences

Button layout is another highly personal choice. There are some great resources to consider. We decided to go full 8 button layout but no roller balls or other odd bits, just because we didn't think we'd need them often enough to justify (though centipede would be fun.) This is what I decided, with some minor tweaks to make P3 & P4 to make things work either visually or mechanically. This pattern fans out nicely under my fingers and doesn't cause weird reach issues.

Finishes


Many cabinets are very flashy and colorful, which is at home in an arcade but not in many homes and comes off as an eyesore to many. We liked the monochrome effect in the referenced design as well as the character representation used. To be honest, we have another phase "planned" that would involve a similar custom combination of heroes (and villains on the opposing side) but given how happy we are with it as-is it is unlikely this design and painting will ever come to fruition.

The control panel is another thing that takes a lot of abuse and I've seen vinyl coated MDF versions worn quickly or metal or plastic versions, but I'm a creature of habit when it comes to materials (preferring wood), so I guess it's not really surprising that I ended up with a Shousugiban (technically Yakisugi) oak panel. I love the tactility it adds to projects which makes it perfect for this area of the machine. I think it also classes it up a bit. For similar reasons, we also chose low key black buttons (without any lights) for one row of buttons, to avoid the "too many buttons" look.

Design Conclusion


In the end we came to this design, it's worked out extremely well. I think if I was starting over, I might consider a wall cabinet version hung on a french cleat) just to further reduce the footprint, but it's good. Also, theory vs. reality lesson learned, I could have probably used fewer buttons on P3, P4 since 4p games never support that many buttons, but #symmetry... One other design feature that I had in my design but never executed (but may eventually get around to retrofitting) is 2 skateboard wheels in the back corners to allow it to tilt & roll since it's kind of hard to move.